
Note: The References, Controls, and Descriptions noted in this article are suggestions/recommendations, not requirements.
If your conversion to VUE is due to a change in ownership (buy-sell), you will skip the Enter Previous Month’s GL Balances instructions because the new company will not need them. Start with Enter the Current Month’s GL Balances.
Enter Previous Month’s GL Ending Balances
Run your current month’s trial balance from your retiring DMS.
In VUE:
- Navigate to Accounting > General Ledger > Manual GL Posting
- Select the “Open” Period
- Select the “General Journal”
- Enter the “Transaction Date” as the last day of the month for the balances you are entering
- Enter the “Reference” of PGLBAL
- Enter your first GL account number
- If the account is “scheduled” enter the “Control” of UPDBAL
- If the account is counted, enter the “Count”
- This will be the beginning balance/balance forward from your current month’s trial balance.
- Enter the “Description” of PGLBAL as of MM/DD/YYYY
- This should be the last day of the prior month of go-live.
- Enter the “Amount”
- This will be the beginning balance/balance forward from your current month’s trial balance.
- Continue with the remaining accounts on the trial balance until complete
- Click “Post” in the action ribbon
The posting must balance to zero (0.00) in order for the post icon to become “active”. You can save the posting and come back to it later if not completed.

Close the Open Period
Once you have completed the Prior Month’s GL balances, you must close the period. To do this:In VUE:
-
Navigate to Accounting > Monthly > Open/Close Periods
- Note: Read the message. Make sure it says, "You should have completed posting to period. If you click continue, you will no longer be able to post to period .” (Be sure this is the prior month.)
-
Click “Continue”
-
Once the period is closed, click “OK”
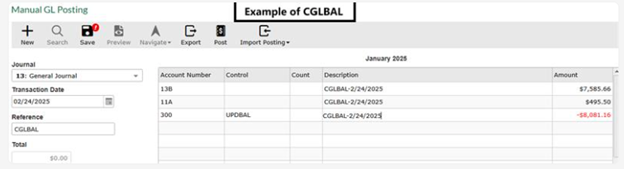
Enter Current Month’s GL Balances
These are step-by-step instructions for entering your general ledger balances for the current month up to your go-live date in VUE.
In VUE:
-
Navigate to Accounting > General Ledger > Manual GL Posting
-
Select the “General Journal”
-
Enter the “Transaction Date”
-
This should be the go-live date.
-
-
Enter the “Reference” of CGLBAL
-
Enter your first GL account number
-
If the account is “scheduled” enter the “Control” of UPDBAL
-
If the account is counted, enter the “Count”
-
This will be the current month’s count from your current month’s trial balance.
-
-
Enter the “Description” of PGLBAL as of MM/DD/YYYY
-
This should be the go-live date.
-
-
Enter the “Amount”
-
This will be the current month’s balance from your current month’s trial balance.
-
-
Continue with the remaining accounts on the trial balance until complete
-
Click “Post” in the action ribbon
The posting must balance to zero (0.00) in order for the post icon to become “active”. You can save the posting and come back to it later if not completed.
Break Out Schedule Detail
These instructions are for all schedules except Accounts Payable. See How to Break Out Accounts Payable instructions on Accounts Payable schedules.
Run schedule reports for all schedules from your retiring DMS as of the go-live date. You can choose to break these out in detail or summary.
In VUE:
-
Navigate to Accounting > General Ledger > Manual GL Posting
-
Select the “General Journal”
-
Enter the “Transaction Date”
-
This should be the go-live date.
-
-
Enter the “Reference” of SCHBAL
-
Enter your GL account number for which you are breaking out the details
-
Enter the “Control” of UPDBAL
-
Skip the “Count” field
-
Enter the “Description” of SCHBAL as of MM/DD/YYYY
-
This should be the go-live date.
-
-
Enter the “Amount”
-
This should be the opposite of the amount on the “UPDBAL” control. Example: Control balance +2500.00, you will enter -2500.00.
-
-
Enter the same GL account number
-
Enter the first “Control” number on your schedule report from your retiring DMS
-
Skip the “Count” field
-
Enter the “Description”
-
Enter the “Amount”
-
This should be the same amount as the control balance on the report from your retiring DMS. Example: Control balance +400.00, you will enter +400.00.
-
-
Continue until you have entered all of the entries from your schedule report
-
Click “Post” in the action ribbon
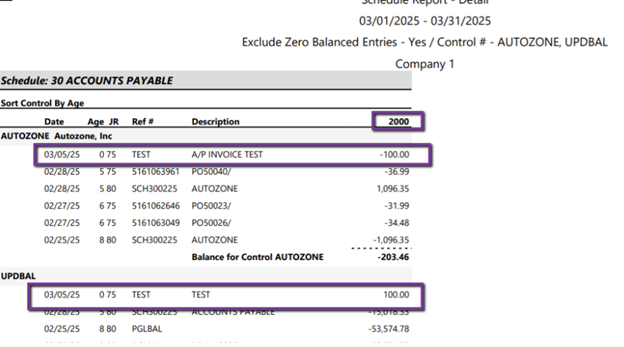
The posting must balance to zero (0.00) in order for the post icon to become “active”. You can save the posting and come back to it later if not completed. When you have completed the posting, run a schedule report. UPDBAL control should have a zero balance when finished.
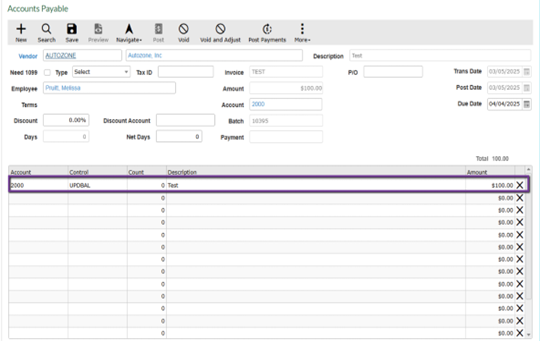
How to Break Out Accounts Payable
Run schedule reports for the Accounts Payable schedule from your retiring DMS as of the go-live date.
-
Navigate to Vendors:
-
Accounting > Accounts Payable > Vendors
-
Update each vendor record that needs to be broken out by adding the default AP account (e.g., 2000)
-
-
Contact Dominion DMS Support to request that they modify Accounting Default Settings:
-
Navigate to Accounting > Maintenance > Default Settings
-
Accounting Page > Accounts Payable Tab
-
Remove the default AP account and add an alternative account (e.g., 2000A)
-
Save the changes
-
-
Break Out the Balances by Creating AP Invoices:
-
Navigate to Accounting > Accounts Payable > Accounts Payable
-
Click New
-
Add the details for each invoice using the account 2000 and control of UPDBAL
-
Click Post
-
- Ensure Proper Posting:
- This will decrease the UPDBAL control and add the payable to the correct control, allowing the user to cut AP checks.
- Contact Dominion DMS Support to request that they revert the Default AP Account:
- Once all invoices are created, navigate to Accounting > Maintenance > Default Settings
- Accounting Page > Accounts Payable Tab
- Revert the default AP account back to the original account (e.g., 2000)
- Save the changes