
OverVUE
Toyota has introduced a new Real-Time Inventory integration between their Dealer Daily Open Access (DDOA) website and VUE. The purpose of the integration is for you to manage inventory in DDOA and then distribute the inventory to your 3rd party providers, including VUE and your CRM system. Changes you make to vehicles which trigger an update from DDOA to VUE are:
• Toyota Motor makes an adjustment to your inventory (+ or -)
• Stock Number
• Price
• Hold Status
• DIO data (dealer installed options) – VUE displays this in the invoice but does not currently support displaying
options within your inventory.
• Media (Images/Video) – Note that VUE does not currently display this media.
Process
To View changes, navigate to OEM DCS >Toyota >Toyota Vehicle Invoice.
1. Filter/sort the grid by selecting Non-Imported, Imported, Adjustments or All in the upper right hand corner and further filter/sort by Invoice Number, VIN number, Stock number, or Invoice Date.
2. Select the desired vehicle by clicking on that line to open the Toyota Vehicle Invoice screen to review invoice details including the description of the vehicle, Cost information, Promote Status (promote a vehicle to an online market place), Hold Indicator (to put a vehicle on hold so it won’t show as for sale), and the Hold Status (Ex. DH = Dealer Hold).
Adding a Vehicle to Inventory
1. If the vehicle has not been added to inventory and has a 17 digit VIN, the [Add to Inventory] button will be available in the Action Ribbon.
2. Clicking the [Add to Inventory] button will open a vehicle preview window.
Select one of the options:
- In Stock -The vehicle will be imported to Inventory as an In Stock vehicle.
- On Order - The vehicle will be imported Inventory as On Order.
- Click the [Add] button to add the vehicle to Inventory.
Transfer an "On Order" vehicle to "In Stock"
Navigate to: Sales > Vehicles > All Vehicles
Inside the Primary Grid:
-
Filter/Sort the primary grid to locate the vehicle.
-
Select the vehicle by clicking on the corresponding line.
Within the Vehicle record:
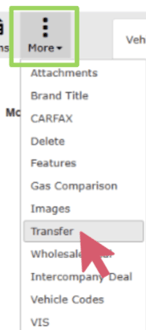
- Hover over the [More] button in the Action Ribbon.
-
Select the Transfer option from the dropdown to open the Vehicle Transfer Window.
-
Click the [Inventory] option to transfer from On Order to In Stock.

Reviewing OEM Data
1. Clicking the [View Vehicle] button in the Action Ribbon opens the vehicle record.
2. Hover over the [MORE] button and select OEM Data to review the OEM Data window. You may mark a vehicle to Promote or Hold.

3. Modifications to an invoice become Adjustments to the invoice. When selecting an adjusted invoice record from the Invoices grid, a message will display on the screen noting that “This is not the
original invoice.” Click [YES] to disable the warning on this invoice in the future.
