
The Service Estimate workflow for Advisors, Parts Counter, and Technicians is designed to streamline the process of creating and approving service estimates in a service department.
This article outlines the actions for each department, ensuring clarity among all team members who are involved and providing a seamless customer experience.
Table of Contents:
- Parts Counter and Service Advisor: Providing the Estimate
- Technician: Inspections and Estimate Ops.
- Parts Counter and Service Advisor: Final Steps
Part A: Parts Counter and Service Advisor: RO Estimate
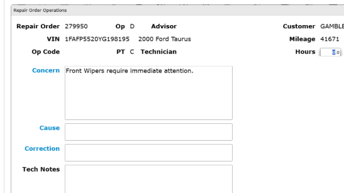
#1. Advisor – Create or Open a Repair Order
- Create a new RO or open an existing one for the customer.
- Add Standard Operations as needed.
- Modify CCC (Concern, Cause, Correction), Op Code, and Labor Hours if necessary.
- From the Operation Detail screen, click [Estimate].
- Provide an Estimate from a Quick Add Op Code by selecting the Estimate box from the Quick Add screen.

Note: Converting a Standard or Deferred Operation to an Estimate is restricted if the following scenarios exist: Paid Tech, Billed Parts, or a Sublet with a PO attached.
The Advisor can now add: Labor, Parts, Sublets, Charges, Discounts, and Taxes
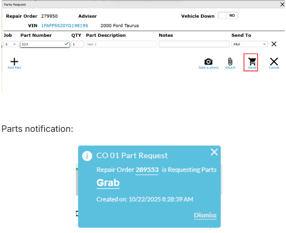
If parts are required for the RO:
- Go to Action Ribbon > Request Parts
- Click [Send] – this sends a toast notification to the Parts Department to update P&A. Parts will default to P&A for Estimate Ops.
Previously Deferred Operations Popup
When creating a new RO, if any previously deferred operations are attached to the vehicle, a pop-up modal appears that allows the user to Add, Estimate, Defer, or Void the previously deferred operations.
The PDO popup includes:
Prefixed (Est) before the concern for previous estimated operations that were deferred.
Columns Included:
-
Status: To show if the estimate is still active or expired.
-
Parts: Will have an info icon hover tooltip.
Estimate is located in the Action Column, in case the job needs to be re-estimated.
Pending Parts Toast Notifications:
Price Review Notification: Users can click the Review Parts link to open the RO in the Back Counter.

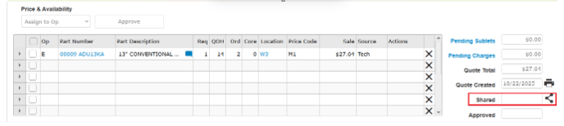
#2. Parts Counter: Update Pricing
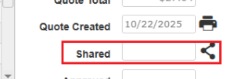
- Parts updates the pricing, prints a quote and must Share with the advisor. Clicking [Share icon] sends a toast notification.
#3. Advisor: Share Estimate with Customer
- On the main Repair Order header screen, the Estimate total will display in the Estimate field

- To print out the estimate, hover over the Print icon in the Action Ribbon and select the appropriate estimate report (Working Estimate, Combined Estimate, or Extended Service Estimate)
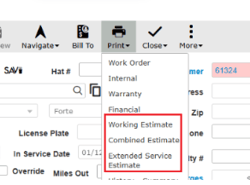
- Working Estimate: Displays the estimate operations and totals only.
- Combined Estimate: Displays standard operations and totals first, then estimates operations and totals on a separate page.
- Extended Service Estimate: Displays the Extended Service Warranty estimate operations and totals with part numbers.
#4. Customer Communication
- Using Update Promise (text or email), send the customer a message and attach the estimate (if needed)
- If not using Update Promise the advisor will call and provide a quote over the phone.
The customer must respond to the advisor’s text/email message. If there is no response, it is recommended to follow up.
- Customer Declines Service – no further action
- Customer Accepts Service
- The advisor goes into the estimate op and [Accepts Service]
- The op is converted to a standard op.
- P&A parts move to Order Fill as Pending in the Back Counter
- Advisor adds Technician to the RO
- Technician can begin working
Part B. Technician Inspection & Estimate Ops.
#1. Open the RO
Note: The “Allow Tech to Add Estimate Ops” service configuration must be set to Yes for the Technician to be able to add Estimate Ops from the MPI and Technician System.
- Tech opens the assigned RO from the Technician System (RO must be released).
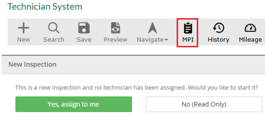
- Click the MPI icon to open the inspection.
- Select the correct MPI form if multiple are available.
- If not assigned, the system prompts: [Yes, assign to me] or [No (read-only)].
#2. Perform the inspection
- Mark items as OK, May Require Attention, or Requires Immediate Attention.
- Add op code, Concern, and Correction for flagged items; attach photos if available.
- Click [Save].
- Recommendations appear at the bottom of the MPI:
- [Estimate] – default, adds a new Estimate Operation.
- [Link Existing Op] – links to an existing Standard Operation
- [Add] – adds a new standard operation (Advisor & Service Mgr. positions only)
- [Defer] - defers recommendation (Advisor & Service Mgr. positions only)
- Advisor & Service Mgr. positions click [Tech Complete]
- Click [Save to RO] to:
- Create Estimate Ops on the RO
- Generate a PDF (saved to RO attachments)
- Track technician recommendations
- Click “Return to Repair Order” to return to the RO; the RO now shows Inspection Completed.
#3. Updating Estimate Ops
From the RO, the Tech can update:
- CCCs
- Labor hours
- Estimate Ops details
- Can use an outside Service Price Guide (SPG) or Labor Time Guide (LTG) for labor times and parts lists.
To request parts:
- Click the Request Parts icon (from the operation, Action Ribbon, or Repair Order Operations modal).
- Click [Send] to notify Parts for pricing/availability updates.
- When finished with the MPI:
- Click [Tech Complete] sends a notification to the Advisor that the MPI is complete with links to both MPI and RO

- Click [Tech Complete] sends a notification to the Advisor that the MPI is complete with links to both MPI and RO
Part C. Parts Counter and Service Advisor: Final Steps
Parts Counter:
- Parts updates the pricing and prints a quote.
- Clicks [Share icon] to send a toast notification to Advisor.
Advisor:
- Review and print the final estimate (attached to the RO automatically).
- Send or discuss the estimate with the customer (text/email/phone).
-
To Void the Estimate, click on existing Estimate operation from within Repair Order to display the Operation Detail screen
-
As with a Standard op, users must remove/delete all Labor, Parts, Sublets, Charges, Discounts, and Taxes from the operation prior to voiding

-
Please go ahead with the Customer Acceptance process as described in Part A: Section #4