
OverVUE
Reconcile Checking Accounts provides you with the ability to reconcile posted payments (EFT or Check), deposits, and/or adjustments made in the system against your dealer’s bank statement.
Accounts are typically reconciled monthly. However, more and more dealers elect to reconcile more frequently, i.e., daily, weekly, etc.
Setup and Activation
To be sure the account is included, navigate to Accounting > Maintenance > Bank and Checking Maintenance
- Select a Bank.
- Select an Account > Edit.
- Confirm that the account is marked YES for “Include In Reconciliation,” so it will be available in Accounting > Cash and Bank > Reconcile Checking Accounts.

Permissions
VUE is a permissions-driven system that tailors security access to suit each users needs. Access to each menu item is managed by an Administrator at your dealership. See the Help article on Roles and Permission to learn how.
See the Permissions Reference Guide to understand what permissions to assign.
In Accounting > Maintenance > Employees. You must have Create, Read, Update, and Delete for Accounting > Cash and Bank > Reconcile Checking Accounts.
Reconcile Checking Accounts Process
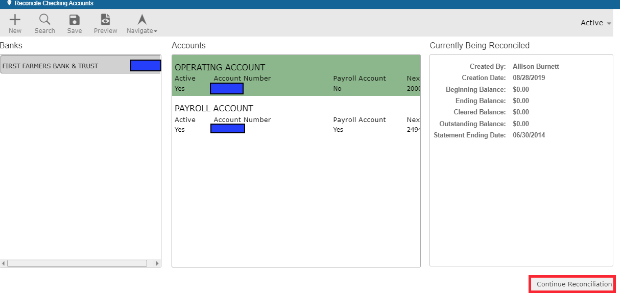
Navigate to Accounting > Cash and Bank > Reconcile Checking Accounts.
- Select the Bank and Account to reconcile.
- If creating a reconciliation, click the [Create Reconciliation] button will be displayed.

- Define the Ending Date and click OK.
Key Features in the Action Ribbon

Filter Dates - Allows you to filter by Date Range.
Filter Checks - Allows you to filter by Check Range.
Clear Voids - Marks your Voided entries as cleared.
Clear Dates - Marks entries within the specified Date Range as cleared.
Clear Checks - Marks entries within the specified Check Range as cleared.
Add Entry - This option allows you to add an entry back to your Non-Cleared Items if it was previously cleared by mistake.
Start Over - Selecting Yes will clear all existing filters and zero out all balances and amounts.
With the Find Amount function, you can type an amount to be found in the table. 
- The defined Ending Date will be displayed in the Statement Ending Date. All entries posted after this date will be excluded from this screen.

- You have the ability to edit the Statement Date. When you navigate away from the Statement Ending Date, confirm by clicking the [Yes] button.

- A notification is provided when the update is complete.

The data is then refreshed automatically.
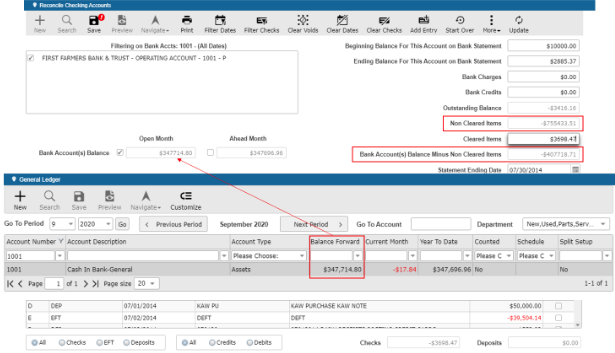
- On the Reconcile Checking Accounts screen, the following fields are populated from your Bank Statement:
- Beginning Balance For This Account on Bank Statement
- Ending Balance For This Account on Bank Statement
- Bank Charges
- Bank Credit

- Upon Bank Statement data entry and with no entries marked as Cleared, the Outstanding Balance is calculated as Beginning Balance For This Account on Bank Statement minus Ending Balance For This Account on Bank Statement minus Bank Charges plus Bank Credits.

- As you mark entries as Cleared, the following fields will be impacted:
- Outstanding Balance
- Non Cleared Items
- Cleared Items
- Bank Account(s) Balance Minus Non Cleared Items
- Checks
- Deposits

- The Open Month and Ahead Month will always be displayed. There is no impact on the Accounting system to have 2 months open. The system is designed to populate the Open Month value with the Balance Forward and Ahead Month with the Year-to-date values from the most current period.

- The Bank Account(s) Balance Minus Non Cleared Items is calculated using the selected Bank Account(s) Balance.

- As Print is selected, the Check Reconciliation Report is displayed and saved as an Attachment: In the Action Ribbon, hover over the More button and select Attachments from the dropdown.
- Once the Outstanding Balance is $0.00, all entries provided on the statement have been marked as Cleared in the system.

- When the Non Cleared Items are deducted from the selected Month’s GL Balance, you should be able to balance the Bank Account(s) Balance Minus Non Cleared Items to the Bank Statement’s Ending Balance.
- When the reconciliation is complete, click the Update button in the Action Ribbon.

- The Check Reconciliation Report will be displayed.

2. You have the ability to access the Updated reconciliations by selecting Updated in the drop down: 
- Select the Updated Reconciliation:


- The Check Reconciliation Report is accessible via More > Attachments

- The figures on the printout will be populated with the Reconciliation Checking Accounts screen when you Print or Update.