
VUE is a permissions-driven system that tailors security access to suit each users needs. Access to each menu item is managed by an Administrator at your dealership. See the Help article on Roles and Permission to learn how.
The following permissions are required to perform this process:
Sales > Vehicle Inventory> New Vehicle Inventory
Sales > Vehicle Inventory > Used Vehicle Inventory
Sales > F&I> Prospect,
Sales > F&I> Sales desk
Sales > F&I> Deal
Sales > Miscellaneous > Customers
See the Permissions Reference Guide to understand what permissions to assign.
Navigate to Sales > F&I > Sales Desk
-
Click New to open the sales desk screen.
Within the Sales Desk:
-
Input a Desk Name. This is a required field.
-
Choose the deal type by clicking on the dropdown and selecting Lease.
-
Add a Prospect
-
Click the + in a black circle icon next to the Customer field, and input a Prospect Name to add a new Prospect. Click [Create].
-
If a prospect was created beforehand, type the prospect's name as LastName, FirstName, or click the magnifying glass to search for the prospect's record. Filter/sort, and select a prospect.
-
-
Add a vehicle
-
Click the magnifying glass icon in the Vehicle field. Filter/sort select a vehicle.
-
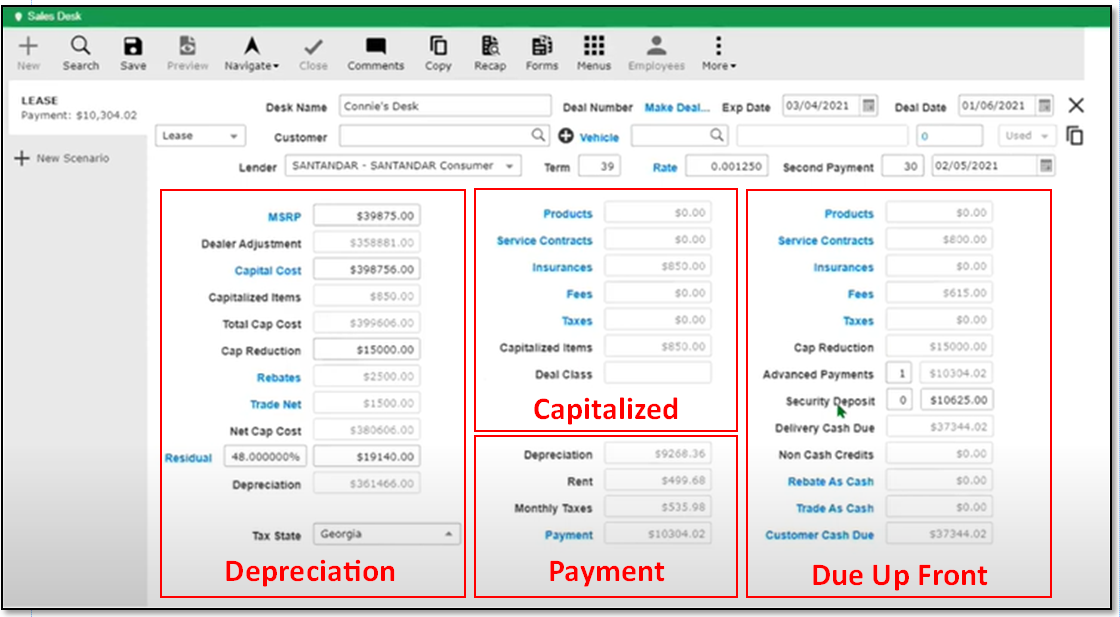
Within the Lease screen:
-
Changing the Deal Type opens the Fees & Taxes window, listing the currently assigned Fees & Taxes.
-
Mark and unmark fees & taxes as needed, and click the [Import] button to configure the sales desk for a Lease scenario.
-
Select a lender from the dropdown near the top of the screen.
-
Input the Term.
Note For a One-Pay lease, input the term at the top of the screen, i.e. 36 months. Then input the same number of months in the Advanced Payment field.
-
Input the Rate or Money Factor per the lender bulletin.
-
Input the Second Payment as the number of days to the second payment. Note that the first payment is paid at the time of signing the lease.
-
Calculate the Depreciation by inputting:
-
MSRP
-
Add residualized products by clicking the MSRP hyperlink. Click [Add], and fill in the description and amount to be added to the MSRP. Click [OK], and click [Save] in the Action Ribbon.
-
-
Capital Cost
-
Capitalized Items - Calculates from the following items in the second column. Note that for a One-Pay Lease, this field must be $0.00.
-
Products
-
Service Contracts
-
Insurance
-
Fees (may default)
-
Taxes (may default)
-
-
Cap Reduction (aka Cash down payment)
-
Rebates
-
Click the Rebates hyperlink to open the Rebates window.
-
Add rebates one at a time.
-
Use the dropdown to select a rebate.
-
Indicate if the rebate is to be taxed or non-taxed.
-
Click the caret to the left of the added rebate to open fields for Program #, Incentive Code, Approval # Qualifying VIN, and Transferred.
-
-
-
Trade Net
-
Click the Trade Net hyperlink to open the Trades window.
-
Click [Add] if the customer attached to the deal has any owned vehicles; select the applicable VIN from within the owned vehicles grid; otherwise, enter the VIN of the trade-in.
- Complete the trade details by entering the mileage, payoff, and all pertinent information before clicking [OK].
-
-
Residual (per the lender's bulletin) - An asterisk next to the Residual hyperlink indicates that changes have been made. Note that clicking the Residual hyperlink opens the Residual window, where you find the Lease Extras (defaulting from the Lender Lease Extras record) including:
-
Disposition Fee
-
Termination Fee
-
Purchase option Fee
-
Annual Mileage Allowed
-
Annual Mileage Purchased (Total miles per year) - For example, If the customer wants to lease for 17,000 miles per year, use 15, 000 as Annual Mileage and 17,000 miles for annual Purchased mileage.
-
Advance Excess Mileage Rate (per mile)
-
Late Excess Mileage Rate (per mile)
-
Mileage to Reduce Residual (number of miles on the vehicle upon delivery)
-
Delivery Mileage Rate (amount per mile for the Mileage to Reduce Residual)
-
Residual Amount
-
Adjustment from Mileage
-
Adjusted Residual
-
-
-
Calculate the Non-Capped items (aka Customer Cash Due).
- Click the Products, Service Contracts, Insurances, Fees, and Taxes hyperlinks one at a time. Review, add/or delete line items in each window. Mark each selection as Capitalized or Non-Capped, and notice that it is applied appropriately in the Capitalized column or the Non-Capped column.
- Click the Products, Service Contracts, Insurances, Fees, and Taxes hyperlinks one at a time. Review, add/or delete line items in each window. Mark each selection as Capitalized or Non-Capped, and notice that it is applied appropriately in the Capitalized column or the Non-Capped column.
-
Input the number of advanced payments (due at signing). Note for a One-Pay lease, input the term at the top of the screen. Then input the same number of months in the Advanced Payment field.
-
Input the Security Deposit code number where:
-
0 = Allow customizable deposit amount.
-
1 = Round the Security Deposit up to the next $25
-
2 = Round the Security Deposit up to the next $50
-
3 = Round the Security Deposit up to the next $75
-
4 = Round the Security Deposit up to the next $100
-
-
If a Rebate was applied when calculating the Depreciation in step 3.e. above, the Rebate As Cash label is a hyperlink.
-
Clicking the hyperlink opens the Rollback Rebate As Cash window.
-
Input the amount of the rebate to use as cash, and click [Calculate].
-
Click the Rollback Results hyperlink to apply the calculated results to the Rebates in the Depreciation column and the balance of the rebate in the Rebate As Cash field of the Non-Capped column.
-
-
If a Trade was applied when calculating the depreciation in step 3.f. above, the Trade As Cash label is a hyperlink.
-
Clicking the hyperlink opens the Rollback Trade As Cash window.
-
Input the amount of the trade to use as cash, and click [Calculate].
-
Click the Rollback Results hyperlink to apply the calculated results to the Trade Net in the Depreciation column and the balance in the Trade As Cash field of the Non-Capped column.
-
Note: If either Trade and/or Rebates are used as CASH, this will decrease the cap reduction the lease has applied to the payment and, therefore, will increase the payment. Allowing Trade or Rebates as cash depends on lender rules and regulations."
Note: For a One-Pay Lease, all items must be marked as Non-Capitalized. These items include Products, Service Contracts, Insurances, Fees, and Taxes. The Advanced Payment field must also be equal to the Term listed at the top of the screen. i.e. When the Term is 36 months, the same number of months must be in the Advanced Payment field.
Did this answer your question?